Can you draw with just an HB pencil?
In this tutorial, I'd like to show you the power of the simplest tool you probably have in your house—an HB pencil, also called no. 2. You don't need to buy anything, so you can just go and see if drawing is for you. ... This process will be the most useful for drawing creatures or characters.
When you try to learn how to draw, the first chapter of the book is often about all these fancy tools you will need. This is quite scary—you have no idea if it's for you, but you're already asked to invest money in it!
In this tutorial, I'd like to show you the power of the simplest tool you probably have in your house—an HB pencil, also called no. 2. You don't need to buy anything, so you can just go and see if drawing is for you. Keep in mind that this tutorial is based on structural drawing—creating final lines on the base of guide lines. If you want to draw more spontaneously, it may not be for you.
I will show you how to start a drawing of a lion from imagination, how to add the anatomy using references, how to use "traditional layers" to remove the guide lines, and how to shade the final drawing. This process will be the most useful for drawing creatures or characters.
What You Will Need
HB (no. 2) pencil
2 sheets of paper (possibly thin; cheap printer paper will be perfect)
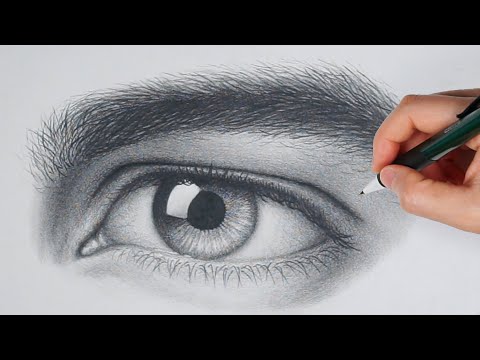
Every pencil has two basic modes you need to know about. You can either draw it the "classic" way or tilt it to draw with the side of the lead...
pencil drawing method tilt
... and you can draw with either a sharpened or blunt pencil. Both are useful!
should i sharpen pencil all the time
A sharpened pencil creates darker black!
You can also control the pressure, which is very important for the final effect. You don't need to press hard every time just to create dark lines! Keep it all in mind during the tutorial, and listen carefully when I mention changing the mode or pressure.
You will also need some references, for example:
Lion body
Lion mane
Lion anatomy
1. Start the Drawing
For this phase of drawing we need thick, general lines. Use a relatively blunt pencil for this purpose—this way you won't be very precise, and it will be easier to resist perfectionism.
Draw very lightly, and later press harder to draw thick lines over the thin ones—don't press hard until you're sure the line should be there. Thin, subtle lines are much easier to fix! If you do it properly, you won't need to use an eraser even once.
Don't worry about mistakes—this layer doesn't need to be clean.
Step 1
The idea in your mind is probably very complex, but we can't draw it all at once. We need to simplify it without losing the spirit of the drawing. To do this, it's best to reduce your idea to a few very general lines. They should show us the size of the final illustration.
how to start a drawing
Step 2
The next step is to establish perspective. No, don't panic! This is easy—just look.
If you want to create an interesting position and show a few sides of the object at the same time, you need to rotate it. To draw rotation, simply shorten and rotate the side.
If you find this confusing, try Think With Forms, Not Lines: Take Your Drawing to the Next Level.
how to easily learn perspective
This is how it can look. Creatures look the best when they're just slightly rotated, because this way you don't need to shorten the sides too much.
perspective base for creature
Step 3
Our creature doesn't have only one side—the front must be rotated as well!
how to draw creatures animals in perspective
You can show it by drawing a few lines here and there just to see the perspective. You don't need to use a ruler—if you can see what you were trying to show, that's all you need!
how to draw an animal without perspective grid
Step 4
You should now be able to imagine a kind of box your creature is standing in. Sketch the paw prints on the ground following the perspective and the pose of the animal.
how to draw paws in perspective
Step 5
Before we draw the legs, you can sketch a very simplified version of them, just to find their end points.
how to draw legs limbs in perspective
2. Construct the Skeleton
Step 1
Let's construct a "skeleton" of the animal to establish the proportions before diving into the details. Skeletons are relatively easy to remember, but if you've never tried to memorize one, don't guess—find a reference, like this lioness with cubs, and analyze it. Usually it's better to use a few references showing various poses and views.