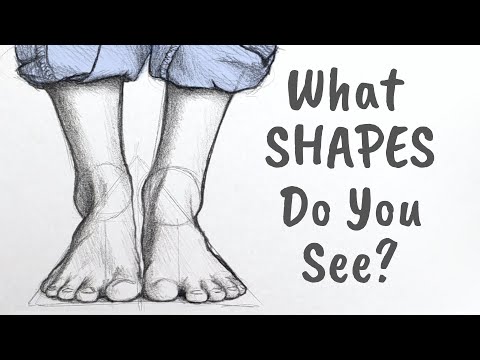
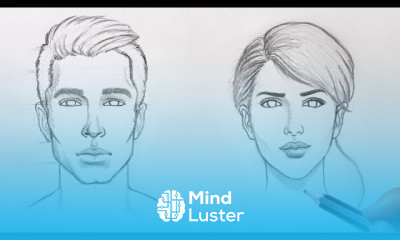
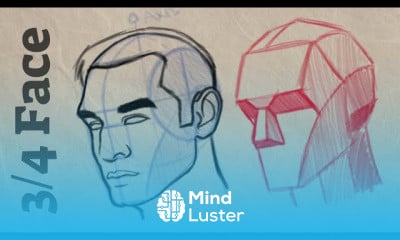
Master basic geometric shapes to construct accurate animal, human, landscape, and object drawings using simple shapes like circles, ovals, triangles, squares, and rectangles
Apply proportional techniques to develop realistic figures and objects based on simple shape guidelines for improved accuracy and confidence
Utilize tracing and sketching methods to simplify complex subjects, enhancing observation and shape recognition skills
Refine drawing skills through iterative practice of shape-based sketching, leading to more realistic and proportionate artwork
Many of you may recognise this process if you bought my Watercolour Secrets DVDs in the past, or viewed the lessons more recently on Art Tutor.
It’s based upon using a few very simple geometric shapes to construct animals, though the technique can be used for human figures, landscape objects, buildings, vehicles - in fact virtually anything.
However, it’s one of those skills that benefit from periodically re-visiting, as a reminder to those who still struggle and as an aid to those who are just setting out.
Even experienced artists will tell you that regularly doing some little basic doodles like this refreshes their brain and helps them from over-complicating pictures.
The Problem - And the Solution
One of the difficulties for anyone learning to draw is that the brain tries to take in all the information and detail it sees in their subject and then in attempting to transfer it to paper all in one go, shapes and proportions become jumbled up and distorted.
Very quickly, the item they’re drawing appears all misshapen and wrong and frustration sets in.
Fear not. The solution can be pretty straightforward and that, as with many things art, is to simplify.
If I gave you the following list of numbers to look at for five seconds then look away for 30 seconds and then repeat them aloud, you'd probably struggle.....
402
626
285
517
783
However, if I rounded them up or down to the nearest 100, you'd find things a lot easier to recall. So we have:-
400
600
300
500
800
In fact, you'd probably instinctively simplify even further in your head, remembering 4,6,3,5 & 8 and then just add the hundreds to each one as you quoted them.
And that's really all we're going to do here, except we use a pencil and simplify a complex figure to just five basic geometric shapes - the triangle, oval, oblong, circle and square.
In fact, if you think that the oval and oblong are just a stretched circle and square respectively, you've actually only three shapes to think about.
In this short lesson, we’re going to look how to draw a flamingo, a wondrous mix of elegant body, spindly legs, the oddest-shaped beak and never-ending neck.
I’ve chosen this because as you’ll see, it’s made up of just those few shapes that can be easily reproduced. The only area that we then have to deal with is getting the relative proportions correct of each part of the body.
In a previous life, I developed a fair amount of drawing skills attending many a boring meeting, waiting for my items to be discussed.
This was long before Art Tutor was born but the reverse of those agenda papers provided an endless source of free drawing surfaces...
Ok, I couldn’t take a photo of a flamingo into the meeting with me, but by then, I was able to keep images in my head which I used to re-create from memory.
You can do the same the more you try it. Sketch by sketch, the easier it becomes.
This is how we (you) do it.
Let's Get Started
Here’s the main reference photo of a lovely pink flamingo on a bright, sunny day. It’s a classic pose, with the bird in shallow water, ready to use that huge beak to dig out morsels from the silt for his lunch.
1Pixbernswaelz.jpg
Now if you step back and observe the photo, you can see that it’s quite easy to break down into several basic shapes. The body forms a convenient oval, with the tail creating a triangular bit at the rear.
The long neck can be represented by a couple of oblongs, while the head and the beak can, for now, be sketched as a small oval and triangle respectively.
2Flamingo and Shapes.png
You can see from the blue shapes that I’ve overlaid on the photo how very simple the technique is. Not only does the image look much less daunting, but this is going to help considerably in making sure your proportions are correct before you start on the details.
3Shapes Only.png
Here, I’ve deleted the photo and we’re left with the basic shapes. Without even picking up the pencil, you can see already that the outline looks pretty good and very much like a flamingo, even though it’s just triangles, ovals and oblongs.
More importantly, the proportions are correct, ie: the legs look long and spindly enough, that neck is the right length and the body is neither too big or small.
The confidence this gives you now to move in and add the more realistic shapes and details cannot be overstated.
Now It's Your Turn
Now print a copy of my reference photo at the size you want - black and white will be fine.
Using a piece of tracing paper (or if you haven’t got tracing paper, greaseproof/baking paper will work just as well) tape it down lightly over your photo to keep it in place.
Now lightly sketch in several basic shapes to create the rough outline of the flamingo. Don’t add any detail yet.
You don’t have to use the same shapes that I’ve used. You might see various parts of the bird differently. That’s fine. It’s how you see it that matters
4Basic Shapes over photo.jpeg
I’ve done my pencil outline a little heavier than normal so you can see it clearer, but when you do this yourself, keep it feint and just dark enough that you can see it.
Once you’ve put in the bolder, more realistic lines, you can gently erase the guidelines to leave a clean image.
Remember, you’re not tracing the outline. It’s merely an estimation of shape and form - but it will be a close one at that.
5Shapes removed from photo.jpeg
Next, remove your tracing paper from the photo and comparing it all the time, start making a more realistic outline of the bird, using the basic shapes as a guide, as I have started to do on the photo below.
Note that my sketch is a bit smudgy. This is because I was using a plastic eraser on the grease-proof paper and it's made it look a bit messy. A putty eraser would have been better.
6Pencil Details.jpeg
Once you’ve completed this bit, gently erase the original rough guidelines and add in any further detail you want, such as feathers, the eye, shading and so on. Here’s my version below. I’ve gone over this one in ink so you can see it more clearly but a pencil is fine.