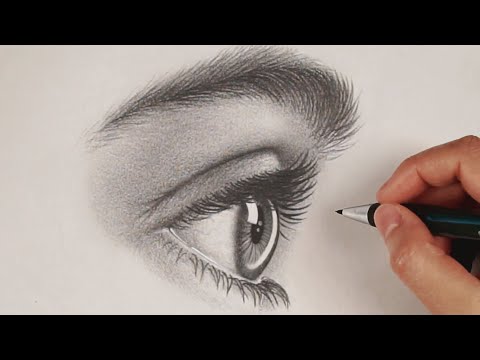
How to Draw an Eye from the Side | StayHome and Draw WithMe
Share your inquiries now with community members
Click Here
Sign up Now
Lessons List | 24
Lesson
Comments
Our New Certified Courses Will Reach You in Our Telegram Channel
Join Our Telegram Channels to Get Best Free Courses
Join Now
We Appreciate Your Feedback
21 Reviews

Aditya ranjan

Shubham Thedon
Ankit
Arman
Show More Reviews
Related Courses in Drawing


Course Description
Learn Pencil Drawing and Pencil Drawing Techniques: Tutorial and Guide
In this tutorial, learn five fundamental pencil drawing techniques. Then, get inspired with pencil drawing ideas and examples.
Share
Pencil art may sound simple, but it’s an art form that can be used to create incredibly detailed and realistic compositions. To get started, you don’t need many materials, but you can benefit from a foundational knowledge of pencil drawing techniques. Armed with these techniques, you will be able to add texture, detail, light, and shading to your creations.
Below, find a comprehensive guide to pencil drawing techniques, as well as everything else you’ll need to get started, from basic drawing materials to a list of ideas for your next piece of pencil art.
Skillshare student Matej Jan used just two types of graphite pencils to create this ultra-realistic portrait. Skillshare student Matej Jan used just two types of graphite pencils to create this ultra-realistic portrait.
Pencil Drawing Techniques
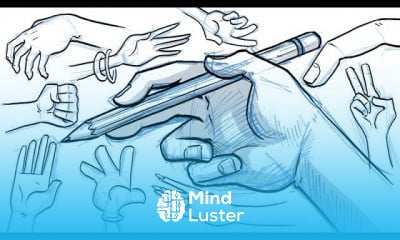
How to Hold a Pencil When Drawing
Before you get started, it’s helpful to learn how to hold a pencil when drawing. There are several different grips you can use to achieve different effects. A traditional grip—the grasp you use when writing—is the most common and natural way to hold a pencil.
You can also opt to hold the pencil further away from the tip, but still with a traditional grip. This will give you a wider range of motion to make longer, looser marks. Or, you might grip closer to the tip of the pencil, using your index finger to press the point of the graphite onto the paper. This can give you leverage to quickly fill in areas of your drawing with dark marks.
As you practice, you’ll find that different pencil grips will be useful for different pencil drawing techniques and types of compositions.
Now, with a pencil in hand, you can move on to foundational pencil drawing techniques.
Hatching
Skillshare teacher Alexandra Gábor demonstrates how to use the pencil drawing techniques of hatching (top right) and cross-hatching (bottom left) to create light and shade. Skillshare teacher Alexandra Gábor demonstrates how to use the pencil drawing techniques of hatching (top right) and cross-hatching (bottom left) to create light and shade.
The technique of hatching consists of filling in areas of a drawing with multiple parallel lines to create the illusion of texture, shadow, and form. You can achieve a more intense effect by increasing the number of lines and their proximity to each other. In other words, the more lines and the closer you draw them together, the darker an area you’ll create.
Hatching can be done in a variety of ways—vertical hatching, horizontal hatching, cross-hatching, or expressive—to achieve different effects.
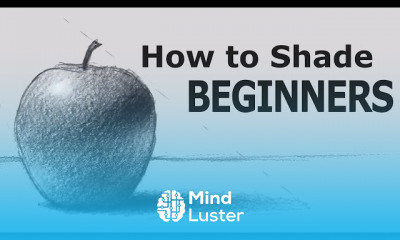
Stumping
Skillshare teacher Alexandra Gábor uses a stump to smudge and blend the shadows of a sphere. Skillshare teacher Alexandra Gábor uses a stump to smudge and blend the shadows of a sphere.
A technique used primarily for shading, stumping refers to the process of smudging elements of your drawing with a stump (a drawing tool made of paper tightly wound into a stick), a soft cloth, or even your finger. You can use this technique to create smooth, evenly blended areas of a drawing, or you can choose to incorporate more movement. For example, by smudging in small, circular motions, you can create a visually interesting texture for trees or shrubs.
Stippling
When stippling, positioning more dots closer together can create the appearance of a shadow. When stippling, positioning more dots closer together can create the appearance of a shadow.
With stippling, you create texture or shadow by drawing a series of dots. Similar to hatching, the more and closer together the dots, the darker an area you’ll create.
Scribbling
The pencil drawing technique demonstrated here is referred to as scribbling, or circulism—a series of random marks to generate dark or shadowed areas or a drawing. The pencil drawing technique demonstrated here is referred to as scribbling, or circulism—a series of random marks to generate dark or shadowed areas or a drawing.
As silly as it may sound, scribbling is considered a pencil drawing technique. And it’s just as free-form as what you are probably picturing. Scribbling, alternatively known as circulism, simply consists of moving your pencil in random formations across the page. Like with the other techniques, the closer you make the marks, the more dense and dark of an area you’ll create.
Contour Lines
This drawing was created with one continuous contour line. This drawing was created with one continuous contour line.
In French, the word “contour” means “outline.” And that’s exactly what contour lines are: the outlines of an object. However, contour lines aren’t only found on the outer edges of an object. In pencil drawings, you’ll also find contour lines within an object, where it has folds or creases or where it changes color or shape.
Trends
French
Graphic design tools for beginners
Artificial intelligence essentials
Formation efficace à l écoute de l
Essential english phrasal verbs
MS Excel
Build a profitable trading
Data Analytics Visualization Techniques
Electrical engineering for engineer
Python programming language
YouTube channel setup
Build a tic tac Toe app in Xcode
Excel skills for math and science
Computer science careers
Printing student ID cards with excel tools
Magento Formation Français
Learning English Speaking
English vocabulary with picture
Figma for UX UI design
Python for beginners
Recent
Growing ginger at home
Gardening basics
Ancient watering techniques
Grow mushrooms
Growing onions
Veggie growing
Bean growing at home
Growing radishes
Tomato growing at home
Shallot growing
Growing kale in plastic bottles
Recycling plastic barrel
Recycling plastic bottles
Grow portulaca grandiflora flower
Growing vegetables
Growing lemon tree
Eggplant eggplants at home
zucchini farming
watermelon farming in pallets
pineapple farming